Looking to edit cronjob in WordPress? You’ve come to the right place! In this blog article, we’ll walk you through the simple steps to edit cronjob in WordPress, ensuring that your scheduled tasks run smoothly and efficiently. Whether you’re a seasoned WordPress user or just starting out, mastering cronjob editing is essential for maintaining your website’s functionality.
So, let’s dive in and explore how to effortlessly customize the cronjobs in your WordPress site to suit your specific needs.

How to Edit Cronjob in WordPress
Cronjobs are an essential feature of WordPress that allow you to schedule and automate various tasks on your website. Whether it’s running regular backups, updating plugins, or sending out email notifications, cronjobs simplify the management of these recurring tasks. In this article, we will explore how to edit cronjobs in WordPress, empowering you to customize and optimize your website’s automation capabilities.
Understanding Cronjobs
Before we delve into editing cronjobs, it’s important to have a clear understanding of what they are and how they work in WordPress. Cron is a time-based job scheduling system that executes specific commands or scripts at predetermined intervals. In WordPress, cronjobs enable you to schedule recurring tasks, such as publishing scheduled posts, checking for updates, or performing database maintenance.
WordPress comes with a built-in pseudo-cron system, which means it simulates cron functionality using PHP. This pseudo-cron system relies on website traffic to trigger scheduled tasks. Each time someone visits your WordPress site, the system checks if any tasks are due and executes them accordingly.
The Advantages of Editing Cronjobs
Editing cronjobs allows you to fine-tune your website’s automation and optimize its performance. Here are a few advantages of editing cronjobs in WordPress:
1. Customization: By editing cronjobs, you can set the precise timing for specific tasks to ensure they align with your website’s needs and peak traffic hours.
2. Efficiency: Eliminate unnecessary cron tasks or adjust their frequency to optimize server resources and improve overall performance.
3. Troubleshooting: Editing cronjobs can help identify and resolve issues related to scheduled tasks not executing correctly, providing greater control over the troubleshooting process.
Editing Cronjobs in WordPress
Now that we understand the importance of editing cronjobs, let’s explore the step-by-step process of editing cronjobs in WordPress. There are two main methods you can use: via cPanel or by editing the wp-config.php file. We will cover both methods to give you a comprehensive understanding.
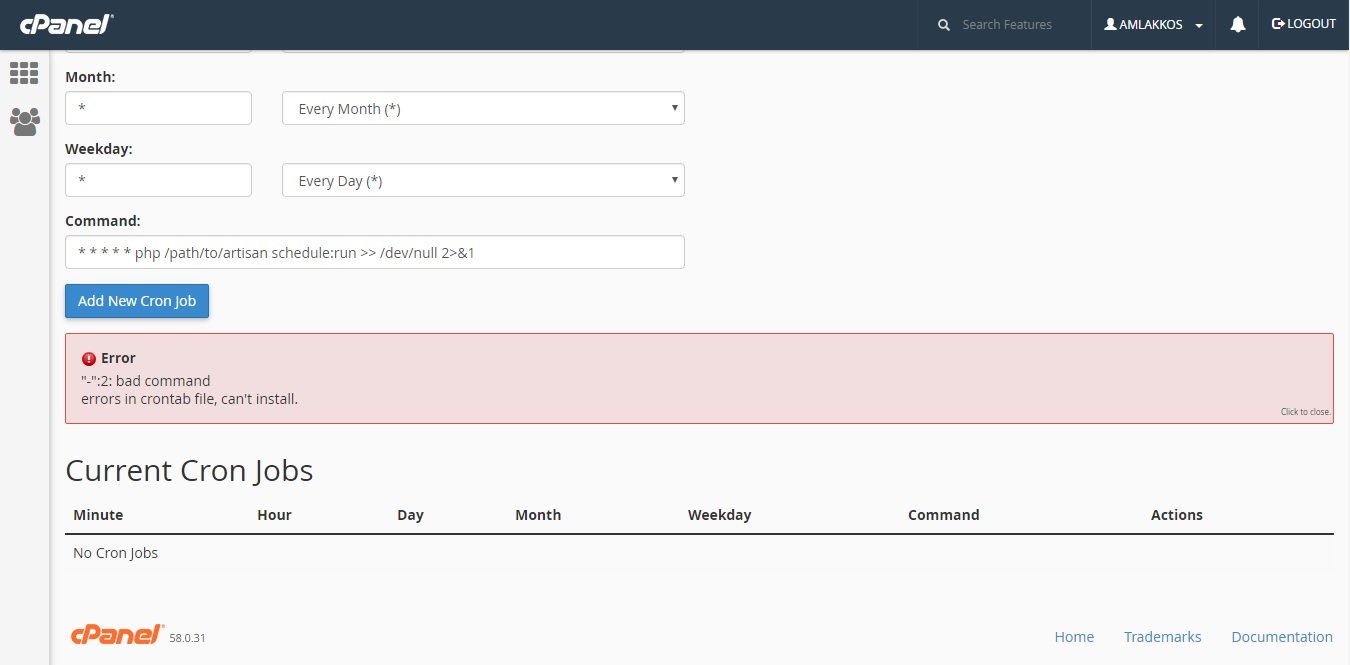
Method 1: Editing Cronjobs via cPanel
cPanel is a web-based control panel commonly used by web hosting companies to manage websites. Many hosting providers offer cPanel access to their customers, making it an easily accessible solution for editing cronjobs. Here’s how you can edit cronjobs via cPanel:
- Login to your cPanel account provided by your hosting provider.
- Locate the “Cron Jobs” or “Cron” option in your cPanel dashboard. It is usually found under the “Advanced” or “Automation” section.
- Click on the “Cron Jobs” or “Cron” option to access the cronjob management interface.
- Choose the appropriate user for the cronjob. Selecting the user depends on the tasks you want to perform. For WordPress tasks, it’s recommended to use the user associated with your website’s files.
- Add a new cronjob by selecting the desired interval (e.g., every hour, daily, weekly, etc.) and entering the command or script to be executed.
- Review the cronjob details and save the changes.
Method 2: Editing Cronjobs via wp-config.php
If you prefer not to use cPanel or your hosting provider does not offer cPanel access, you can edit cronjobs directly via the wp-config.php file in your WordPress installation. Follow these steps to edit cronjobs using this method:
- Connect to your WordPress website using an FTP client or the File Manager in your hosting control panel.
- Locate the wp-config.php file in the root directory of your WordPress installation.
- Edit the wp-config.php file using a text editor of your choice.
- Add the following line of code just before the “That’s all, stop editing!” comment:
define('DISABLE_WP_CRON', true);- Save the wp-config.php file and upload it back to the server.
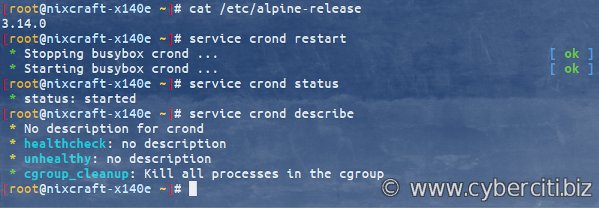
- Access your server using SSH or a terminal emulator.
- Navigate to the root directory of your WordPress installation.
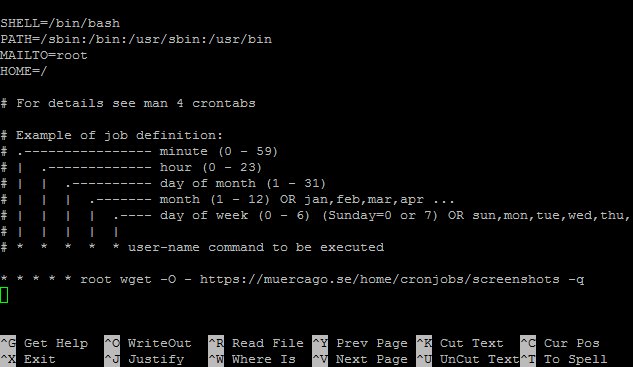
- Run the following command to edit the cronjobs:
crontab -e- Add the desired cronjob command or script using the appropriate syntax (e.g.,
* * * * * wget -q -O - http://yourdomain.com/wp-cron.php?doing_wp_cron >/dev/null 2>&1). - Save the changes and exit the editor.
Best Practices for Editing Cronjobs
To optimize your cronjobs and ensure smooth automation, consider the following best practices:
1. Regular Maintenance
Perform regular maintenance on your cronjobs to remove any redundant tasks and update intervals based on your website’s changing needs. This practice will help keep your cronjobs organized, streamlined, and efficient.
2. Test and Monitor
After editing cronjobs, thoroughly test and monitor their execution to ensure they are functioning as intended. Regularly checking logs and verifying task completion will help you identify and address any issues promptly.
3. Prioritize Security
When editing cronjobs, prioritize security by restricting access to sensitive cron scripts and regularly reviewing command inputs to prevent unauthorized or malicious activities.
4. Leverage Plugin Functionality
If you prefer a more user-friendly approach, consider using plugins specifically designed for managing cronjobs in WordPress. These plugins often provide a graphical interface, making it easier to edit, manage, and monitor your cronjobs without directly modifying code or using cPanel.
Editing cronjobs in WordPress empowers you to customize and optimize your website’s automation capabilities. Whether you choose to edit cronjobs via cPanel or directly through the wp-config.php file, understanding the process and following best practices will help you enhance the efficiency, reliability, and performance of your scheduled tasks. Regularly reviewing and fine-tuning your cronjobs will ensure that your website remains up-to-date and functioning smoothly. Take advantage of this powerful feature to streamline your website management and save time for more important endeavors.
How To Disable The WordPress Cron & Replace With A Real Cron Job – A Must For All Ecommerce Websites
Frequently Asked Questions
How can I edit a cron job in WordPress?
To edit a cron job in WordPress, follow these steps:
1. Log in to your WordPress admin dashboard.
2. Navigate to the “Tools” tab in the left sidebar and click on “Cron Events”.
3. You will see a list of scheduled cron events. Locate the specific cron job you want to edit and click on it.
4. In the cron job details, you will find options to edit the schedule, the hook, or the arguments. Make the necessary changes according to your requirements.
5. After making the desired modifications, click on the “Update Cron Event” button to save the changes.
What if I want to delete a cron job instead of editing it?
If you want to delete a cron job in WordPress, follow these steps:
1. Log in to your WordPress admin dashboard.
2. Navigate to the “Tools” tab in the left sidebar and click on “Cron Events”.
3. Locate the specific cron job you want to delete and click on it to view its details.
4. Scroll down to the bottom of the page and click on the “Delete” button. A confirmation prompt will appear.
5. Confirm the deletion by clicking on “OK”. The cron job will be removed from your WordPress installation.
Can I manually add a new cron job in WordPress?
Yes, you can manually add a new cron job in WordPress by following these steps:
1. Log in to your WordPress admin dashboard.
2. Navigate to the “Tools” tab in the left sidebar and click on “Cron Events”.
3. Scroll down to the “Add Cron Event” section and enter the necessary details such as schedule, hook, and arguments.
4. Click on the “Add Cron Event” button to create the new cron job.
Is it possible to view the output of a cron job in WordPress?
Yes, you can view the output of a cron job in WordPress by following these steps:
1. Log in to your WordPress admin dashboard.
2. Navigate to the “Tools” tab in the left sidebar and click on “Cron Events”.
3. Locate the specific cron job you want to view the output for and click on it to view its details.
4. Scroll down to the bottom of the page, and you will find the output of the cron job under the “Output” section.
Are there any plugins available to manage cron jobs in WordPress?
Yes, there are several plugins available to manage cron jobs in WordPress. Some popular options include:
– WP Crontrol
– Advanced Cron Manager
– WP Control
– Cron GUI
These plugins offer additional functionality and an easy-to-use interface for managing cron jobs within WordPress.
Final Thoughts
To edit cronjobs in WordPress, follow these simple steps. First, access your hosting account’s cPanel and locate the ‘Cron Jobs’ option. Once inside, find the cronjob you want to edit and click on ‘Edit’. Make the necessary changes to the command or schedule, and click ‘Save’. Remember to test your new cronjob to ensure it functions correctly.
By following these steps, you can easily edit cronjobs in WordPress without any hassle. So, when it comes to managing your WordPress cronjobs, modifying them to fit your requirements is a breeze.